 minute read
In ViKING POS Designer, a layout contains the components that are required for a particular workflow. You may, for example, create a layout for logging in to a till, a layout for selling articles and accepting payment, etc. You'll typically end up with a number of layouts in your diagram, and the layouts can then refer to each other so that you can transparently offer even complex combinations of workflows in your diagram.
If required, you can design the same layout in different variants for use on mobile phones, tablets as well as 4:3 and 16:9 POS screens.
Layout types
When you add a new layout, you can select between these layout types:
-
DrawerWithCarousel: A special layout type for accommodating the carousel component (and any other components you may need). It's prepopulated with a carousel, some drawers, and some other components, but you can remove the components that you don't need and add new components as required.
-
DrawerWithStackPanel: A special layout type for accommodating drawer components. It's prepopulated with a left drawer, a right drawer, and a bottom drawer as well as some buttons, but you can remove the components that you don't need and add new components as required.
-
StackPanel: The most common type of layout. You can add any type of component to it, except carousel and drawer components. By default, this layout type has three columns, but you can change that when you add it.
-
GlobalPrompt: A special layout type for creating notification dialogs that can be defined once and then used across all layouts.
Modify existing layout
Because many people use a POS Designer template as the basis for their design, they often modify the template diagram's layouts rather than adding and designing new layouts from scratch.
How to modify an existing layout of course depends on what you want to do with it, but most people begin by either editing one of the layout's components or by adding a new component.
To edit component in a layout:
-
In the dark bar in the left side of POS Designer, select the Explorer tab.
-
In the Layout field, make sure that you have selected the required layout.
-
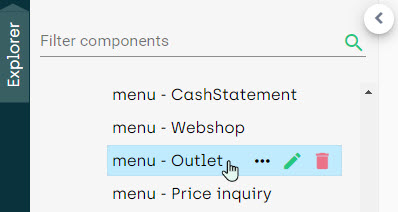
The Explorer tab displays the structure of the layout, including its components and their elements. In this example, we've selected a menu component's Outlet element:
-
Select the required option, for example the edit
 option.
To add a new component to a layout:
-
In the dark bar in the left side of POS Designer, select the Explorer tab.
-
In the Layout field, make sure that you have selected the required layout.
-
In the dark bar in the right side of POS Designer, select the Toolbox tab.
-
Expand the required components section, for example Basic or Action, and drag the required component to the required position on the layout. Then edit the component as required, for example changing its color properties.
Learn more about components in ViKING POS Designer components.
Add new layout
-
Select the Explorer tab in the dark bar in the left side of the POS Designer
-
In the Layout field, click the plus sign

-
Select required display format (mobile, tablet, screen 4:3, etc.)
-
Select the required layout type
-
Specify a name for the new layout
The name can't contain spaces.
-
Specify the required number of columns in your layout
-
Click Create
-
A detailed Add layout window opens. If required you can specify details about the new layout's size, padding, margins, borders, etc.
-
When ready, click Add
You can now add components to your new layout. Learn more about components in ViKING POS Designer components.
Clone existing layout
If required, you can make a clone of the layout that you currently have open in your POS Designer.
-
Make sure that you have opened an existing layout
-
In the POS Designer top menu, click
 , and select Clone layout
 -
In the Layout name field, specify a name for the new clone of the layout
The name can't contain spaces.
-
Edit other settings as required
Note that some settings may conflict with the original layout if you edit them. For example, if the original layout is a three-column layout where all three columns contain components, the original layout will break if you reduce the number of columns on the copy. On the other hand, you can easily add a fourth column to the copy without breaking the functionality of the original three-column layout.
-
When ready, click Clone
Download layout
If others have created a layout, they can upload it to a local file system.
You can then download the layout from the local file system:
-
In the POS Designer top menu, click
, and select Download layout -
Navigate to the required layout (it's in the .json file format) and download it
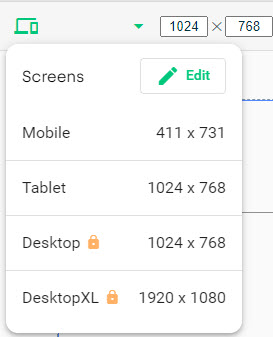
Specify layout size (4:3, 16:9, mobile, tablet)
When you design a layout, you can design it for mobile phones, tablets, or desktop screens with 4:3 or 16:9 aspect ratios.
If you want to design a layout that matches multiple screen sizes, you must design a separate layout for each required screen size (example: returns_4_3, returns_16_9, returns_mobile, and returns_tablet). However, thanks to the copy feature, you don't need to recreate the layout from scratch for each required screen size.
In the menu above your layout, select either Mobile, Tablet, Desktop), or DesktopXL.
Each format has a default size, for example 411×731 pixels for Mobile, that you can adjust to suit your organization's needs.
If you click the Edit button in the Screens menu, you can furthermore add new screen layouts to suit your organization's exact needs.
Add components to layout
As described in the topic ViKING POS Designer, a diagram contains layouts, and layouts contain components. Together, they make it possible for till users to complete all required workflows.
-
For information about how to add components to a layout, see ViKING POS Designer components
Connect layouts to support workflows
Each layout typically supports a group of related workflows. Examples:
-
A layout for logging in to the till
-
A layout for selling articles and accepting payment
-
A layout for handling customer club queries and registrations
When we say that the layouts can refer to each other so that you can transparently offer even complex combinations of workflows, it's not the layouts themselves that are linked. Rather, it's the components on the layouts – primarily the action components, such as buttons and menus – that can have properties that let users transparently move between layouts.
For example, the layout for selling articles and accepting payment can have a Customer Club menu button, and if the user taps that button, an action defined for that button will make the till display automatically switch to the layout for handling customer club queries and registrations.
Likewise, if the user taps a Back to Sales menu button on the customer club layout, an action defined for that button will automatically switch to the layout for selling articles and accepting payment.
This way ...
-
Users will not know that there may be multiple layouts in the design that you've created. Users will simply experience that their till display supports all the workflows that they need to do their tasks.
-
Layouts themselves don't connect to each other. It's the properties of the layouts' components that make layouts seamlessly connect into a complete till display.
Upload a layout
If you've created a layout, you can upload the layout to a local file system.
Others can then download the layout into their POS Designer from the local file system:
-
In the POS Designer top menu, click
, and select Upload layoutPOS Designer will store the layout in your local Downloads folder with a file name based on this structure: [layout name].json
-
Place the .json file on a local file system, and notify the people who should be able to download the layout
Send layout to another diagram
If you have multiple diagrams, you can send a layout from one diagram to another. This can be useful, for example, if you design user interfaces for two chains with identical workflows but different branding. In such a case, you can create a layout on one of the diagrams and then send the layout to the other diagram, where you can reuse the layout by changing its branding elements.
To send a layout to another diagram:
-
Make sure that you have opened the layout that you want to send.
-
In the POS Designer top menu, click
, and select Send layout -
In the dialog that opens, select the required Destination diagram.
-
If the destination diagram contains a layout with the same name as the one that you're going to send, you can choose to overwrite the existing layout on the destination diagram with the layout that you're going to send. If you are absolutely sure that you want to do that, select Overwrite layout.
If you're unsure, don't select this option.
-
Click Send.
Default layout
If you've created a series of layouts, you can mark one of them as your default layout, so that you can quickly jump to it, for example in order to clone it so that you can base other layouts on it.
To mark a layout as your default layout:
-
Make sure that you have opened an existing layout.
-
In the POS Designer top menu, click
, and select Mark as default
To quickly jump to a layout that you've marked as your default layout:
-
In the POS Designer top menu, click
, and select Default layout.
When you work with a layout, remember that you must save your changes. To save your changes, click the  button in the menu above your layout. Alternatively, you can use autosave.
Typical next step: Add components to your layout
© 2026 Fiftytwo A/S • Disclaimer
Last update: 29 May, 2026 12:21:08 CET
Share this page with your colleagues: