 minute read
You can manage your articles for a single store as well as for multiple stores at the same time in ViKING Store Management. Here, we primarily describe ViKING Store Management for single-store management, but if you've set up synchronization between your chain's enterprise service and your stores' store services, you can use ViKING Store Management for chain-wide store management as well.
-
Open ViKING Store Management in a browser, connect to the IP address or hostname of the required ViKING store service (for single store management) or enterprise server (for multistore management), and log in.
-
Navigate to articles:
-
Expand
 the menu in the left part of the page
 -
Expand Article maintenance
-
Select Articles
-
Manage existing articles
Many stores manage existing articles more frequently than they manually add new articles. That's because most stores automatically import new articles from their ERP system.
-
Find the required article:
-
In the filters section at the top of the page, search
 for the article's Article number or Receipt text
If you want to control what information is displayed on the page, you can click
 in the top right part of the page. The fact that a piece of available information may not be displayed on the page will not affect your filtering options.
-
-
Click the required article's Article number.
-
You can view and edit information about the article on the tabs described in the following. When you're done editing, remember to click
 at the top of the page to save.
General
You can't edit the article's name in the wide field at the top of the General tab, but you can edit the tab's other sections:
-
Article information
-
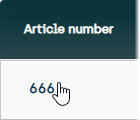
Article number: Required. Maximum 13 characters. Article number is a key field that you can't edit later.
-
Receipt text: Required. Maximum 30 characters.
-
Long article name: Optional longer description. Used by some organizations to specify a detailed article name.
-
-
Details
-
Labels: A label is an attribute that enables a many-to-one relation between articles and a discount group.
The feature makes it easy to grant a discount on multiple articles that have a given label in common, for example Organic, Textile, or Bosch, so you can quickly grant discounts on large volumes of articles (for example All organic, All textiles, or All Bosch) even though those articles don't necessarily share other attributes or belong in the same departments, article groups, etc.
Example: For a limited period your store wants to offer 25% off all organic articles, no matter whether they're organic vegetables, organic textiles, organic wine, organic meat, or any other type of organic articles. If you add an Organic label to all organic articles, you can then cover all those articles with a single selection when you set up the discount group.
A single article can have multiple labels. So if you, for example, want to be able to easily include a Bosch power drill in future All Bosch offers as well as in All power tools offers, you can simply add two labels to the drill: Bosch and PowerTool.
Example: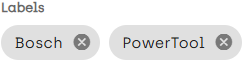
Labels can contain up to 30 characters. Labels can't contain spaces. Labels must be ASCII character set compliant.
To add a label, type the required value, and then press Enter on your keyboard.
For information about how to select a label when you set up a discount group, see Manage discount groups in ViKING Store Management.
-
Internal article number: Used by some organizations to specify an internal article number, for example if the organization produces its own articles.
-
Supplier: Used by some organizations for statistical or tracing purposes.
-
Order number: Used by some organizations for statistical or tracing purposes, for example to track sales of a consignment related to a particular order number.
-
Group: You can select an article group that the article should belong in.
The fact that an article belongs in article group can be used for many purposes, such as article group-based discounts, article group-based statistics, or article group-based thresholds (for example how many articles from an article group that shop assistants can sell with a till's multiply (×) function).
-
Price group: Used by some organizations for being able to change the price of all articles in a price group in one go. See Manage price groups in ViKING Store Management.
-
Producer: Used by some organizations to group sales of articles from particular producers, for example for campaign or statistical purposes.
-
Item type: Used by some organizations to group sales of articles from particular producers, for example for statistical purposes.
-
-
Prices
-
Price: Price that the article will be sold at, including any VAT defined in the Tax field.
If you've selected a price group for the article, all other articles that are members of the same price group will get the price that you specify. See also Manage price groups in ViKING Store Management.
-
Normal price: Normal price or suggested retail price of the article.
-
Cost price: Cost price of the article, that is the price at which the article has been bought by your organization.
-
Cost price without VAT: Cost price of the article without VAT, that is the price without VAT at which the article has been bought by your organization.
-
Gross profit percentage: Based on your other settings for the article, this fields displays your organization's gross profit percentage on the article.
-
Gross profit: Based on your other settings for the article, this fields displays your organization's gross profit amount on the article.
-
Tax: Select VAT percentage on the article. Your organization can define up to nine VAT percentage levels as well as a 00.00% level for articles on which there's no VAT.
The VAT rate that we need isn't on the list. Where do we define it?

-
Negative price: Select to make the price negative. Used for, for example, bottle deposit refunds.
-
-
-
Family: If the article should be part of a discount family, select the required family.
-
Discount quantity: Works closely together with the two neighboring fields. In this field you define the quantity of the article that customers must buy in a single purchase to trigger the discount.
You can use a quantity of 1 if you simply want to mark down the article. However, if the markdown is permanent, it may be better to edit the price on the General tab (see the previous) or in your backend system (if you import article information from an ERP system or similar). Note that the way that you mark down articles may also affect statistics about sales and/or the effect of discounts and campaigns. Ask your Fiftytwo administrator if you're in doubt.
-
Discount code: Works closely together with the two neighboring fields. Select between four options:
-
Save: If customers buy the quantity defined in the Discount quantity field, they will save the amount defined in the Discount/price field.
Example: Buy three and save EUR 5.00.
-
For: If customers buy the quantity defined in the Discount quantity field, they will get that quantity for the amount defined in the Discount/price field.
Example: Buy three for EUR 20.00.
-
Get (%): If customers buy the quantity defined in the Discount quantity field, they will save the percentage defined in the Discount/price field.
Example: Buy three and save 10%.
-
Pay (% for the cheapest): If customers buy the quantity defined in the Discount quantity field, they will pay the percentage defined in the Discount/price field on the cheapest of the articles.
Example: Buy three and pay 0% of the original price of the cheapest article (that's what you'd typically use for a 3 for 2 discount).
Because the discount only applies for the article that you edit, none of the article units will be the cheapest, so, in order to be able to handle possible returns, the discount will be distributed across the number of articles that triggered the discount. For example, if you set Discount quantity to 3, and the customer buys three units of the article, the discount will be distributed across the three article units.
-
-
Discount/price: Works closely together with the two neighboring fields. In this field you define the discount amount, discount percentage, percentage of the original price to pay, or price that customers will get if they buy the required quantity of the article.
-
Max quantity: Specifies the maximum quantity of the article that customers can buy in a single purchase and still get the discount. If they buy more units of the article than the maximum allowed quantity, they must pay the full price for the excess units.
Example: To attract customers, you want to sell bottles of a popular brand of ketchup at a very attractive discount. However, you also want to prevent that a few customers buy all of the bottles, so that there's nothing left for other customers. To do that, you specify a maximum quantity of six bottles. If a customer then buys ten bottles in a single purchase, they'll only get the discount on the first six bottles, so that they must pay the full price for the four excess bottles.
-
In sets: Determines what happens if the customer buys more units of the article than you've specified in the Discount quantity field (for example if you've specified a discount-triggering quantity of three units and the customer buys four).
-
If you select In sets, the discount is only triggered when a multiple of the discount-triggering quantity is registered
Example: If you've specified a discount quantity of three and you select In sets, the discount will be triggered when customers buy three units, six units, nine units, etc., but if they buy four units, they'll only get the discount on three of them.
-
If you don't select In sets, the discount continues proportionately for further quantities of the article once the discount-triggering quantity has been reached
Example: If you've specified a discount quantity of three and you don't select In sets, the discount will be triggered when customers buy three units, and if they buy four units, they'll get a proportional discount on the fourth unit too.
-
-
Calculated VAT: Based on your other settings for the article, this fields displays the amount of VAT that customers will pay for the article.
-
Exclude form article group: If the article belongs to an article group (see the Details section's Group field in the previous), that article group can have a group discount percentage defined.
You can select to use, not use, or override the group discount percentage for the article in question:
-
To use the group discount percentage as it's defined on the article group, specify -1
-
To not use the group discount percentage as it's defined on the article group, specify 0
-
To use another discount percentage than defined on the article group, specify a number to indicate the required discount percentage, for example 500 to indicate a 5% discount
-
-
Percentage discount converted to amount: If you've selected to grant a percentage discount, this field displays – based on your other settings for the article – the percentage discount converted to the amount of money that customers will save.
-
Staff discount: You can select if a staff discount should apply for the article. Your organization can define up to four staff discount percentage levels (as well as no staff discount).
Staff discounts apply for the article as such, and don't require that members of staff buy a certain quantity of the article.
Staff discounts are always given on top of other discounts on the article, so if a member of staff buys a quantity of the article that entitles them to a discount, they'll get that discount as well as the staff discount.
-
Click
at the top of the page to save.Stock
If you're a store manager who wants to know the exact stock level of an article in your store at any given time, you can view that information together with the article's other data.
You get a snapshot of the current stock level, you can view the day's stock level changes, and you can view historical stock figures from other days for comparison.
Today's stock
Note that these figures are a snapshot of the current state. The figures may change during the day.
-
Added: Quantity of the article that has been added to the store's stock during the current day (technically also known as the current session).
This number may include new units of the article that have been received in your store's goods reception, units of the article that have been returned, and units of the article that have been added to your store's stock manually (see Update stock levels in ViKING Store Management).
-
Removed: Quantity of the article that has been removed (not sold) from the store's stock during the current day.
This number may include units of the article that have been discarded, damaged, etc. (see Update stock levels in ViKING Store Management).
-
Sold: Quantity of the article that has been sold during the current day.
-
Current stock: The accumulated effect of the previous three fields on the store's current stock level of the article.
Stock history
Historical stock figures from other days for comparison.
Statistics
View sales and revenue statistics about the article.
You can compare the numbers with the previous period's numbers, so if you've selected, for example This week, you can compare the numbers with the previous week's numbers.
Images
To add an image of the article, click the
 button and browse for the required image.
If required, you can add multiple images. If you add multiple images, you can make one of the images the article's default image: Place your pointer over the thumbnail of the required image, and select the star symbol:

The article image (the default article image if you've added multiple images) will be used if you include the article in a view group (also known as PLU buttons), provided you don't specify another image when you set up the view group.
Click
at the top of the page to save.Barcodes
You can associate the article with one or more barcodes, and specify a quantity associated with each barcode.
Example: You want to associate an article with two barcodes: One for a single unit of the article (the barcode on the article itself) and one for a box of 24 units of the article (the barcode on the 24-unit box).
You can enter the barcodes manually, or you can place your pointer in the empty field in the Barcode ID column and use a scanner to input the barcode number.
Remember to click
 each time that you've added a line.
Click
at the top of the page to save.Shelf label
You can specify shelf-edge label settings for the article. Depending on the setup of your shelf-edge label system, shelf-edge labels will then be printed, marked for printing, or updated (if you use electronic shelf labels, ESLs) when you change article information, such as price, name, etc. Ask your Fiftytwo administrator if you're in doubt.
-
Make sure the Shelfmark section is expanded, and then select Has shelf label.
-
Specify the following:
-
Shelf label 1: Primary line of text on the shelf-edge label.
Keep your text short and descriptive. Many shelf-edge labels are only able to display a limited number of characters. Ask your Fiftytwo administrator if you're in doubt.
-
Shelf label 2: Optional secondary line of text on the shelf-edge label.
-
Label type: Select required type of shelf label (your organization may have specified different types of shelf labels, for example small, large, special offer, etc.).
-
Label amount: Specify number of shelf labels to generate. Primarily relevant for printed shelf labels.
-
Content quantity: Specify the article's content quantity (only the number, not the unit).
For an article that contains 1 kg, specify 1.
-
Content indication: Specify the unit that's used to describe the article's content quantity.
For an article that contains 1 kg, specify kg.
-
Unit price: Based on your other settings for the article, this fields displays the article's price per unit.
-
Quantity per package: Use if you also sell the article in fixed-size packages, for example boxes of 24 units of the article. Specify only the number, not the unit.
For a package that contains 24 cans of the article, specify 24.
See also Barcodes in the previous.
-
Identification of package size: Specify the unit that's used to describe the package's content quantity.
For a package that contains 24 cans of the article, specify cans.
-
-
Click
at the top of the page to save.
Advanced
-
Statuscode: Use of the status code field depends on your organization's setup.
-
Many organizations don't use this field at all
-
Some organizations use status codes to determine if the amount in the Discount section's Discount/price field covers discount or n-unit price
-
Some organizations use status codes to indicate if discount must be calculated based on the quantity registered with the till's multiply (×) key or based on number of units (where each scanning or manual article number entry counts for one)
-
Some organizations use status codes for other purposes
Ask your Fiftytwo administrator if you're in doubt.
-
-
Accompanying product: Select if a linked article should automatically be sold together with the article.
Examples: For a bottled soft drink, you can select that it must always be sold with a bottle deposit. For a trampoline, you can select that it must always be sold with a compulsory safety net .
-
Nr. of decimals: Defines the number of decimals that must be used if shop assistants enter the article's price on the till.
For articles that have barcodes and are weight-variable, ViKING uses the value to calculate where to place the comma in the barcode information.
Example: If you set Nr. of decimals to 3, and the barcode says 2622220036145 (where the last digit (5) is a check digit), ViKING will interpret it as article number 26222 in a quantity of 3,614. In such cases, you must set up the article's price as a price per kilo.
-
Amount allowed: Defines if use of the till's multiply key (×) is allowed for the article. You have four options:
-
No, number must never be specified: May, for example, be relevant for articles where you need to register additional individual information, such as a serial number or similar.
-
Yes, number can be specified: Used for ordinary articles.
-
Yes, number must always be specified: Used for articles that normally aren't sold as one unit, for example articles that are sold by running meter or by weight.
-
Number can be specified, but content must always be specified: Used for articles that have different content, for example planks of wood that have the same article number regardless of length.
Example: You can sell the article as, for example, 10 planks of 2.70 meters. You register article quantity with the till's multiply key, and the till then asks for the length.
-
-
Entercode: Defines if shop assistants are allowed to enter the article's price on tills. Can also be used to block sales of the article. You have four options:
-
Price not allowed to be written: The article is sold at the price that's defined in the General tab's Price field (see the previous).
-
Price can be written: If the General tab's Price field has a value of 0, a price must be entered. Otherwise, the price that's defined in the General tab's Price field is used, but shop assistants with the required user rights can change it on the till.
-
Number is a means of payment: The means of payment code must be defined in the receipt text. Typically used for bottle deposit redemption slips.
-
Item not sellable: The article mustn't be sold. This may apply to raw materials or articles on pallets, but also to articles that have been recalled by the manufacturer, articles that must not be sold in stores in certain regions or federal states, etc. See also Block sales of an article.
-
-
Voucher: Defines if the article is a non-physical article, like talk time or lotto.
Despite its name, the setting has nothing to do with whether or not the article can be paid for with vouchers, also known as coupons.
-
Rules: Select if a rule applies to sale of the article, for example if customers must be 18 years or older to buy the article.
-
Printer: Defines if a printing rule applies to the article, for example if the article is an outsize article, such as a canoe, that requires a dispatch note to be printed so that the customer can pick up the article at a collection point outside the store.
-
Additional article information: Defines if the article requires a special text section to be printed below the article's regular receipt text (defined on the General tab) on receipts.
-
Sales group: Typically used to apply restrictions on sale of articles that belong in a particular sales group.
Example: If the article belongs in a sales group for over-the-counter medicine, it's not possible to sell more than one unit of the article at a time.
-
Club number: If membership of a loyalty / customer club must be required to get a discount on the article, select the required club.
ViKING handles loyalty / customer clubs in a separate add-on module. Not all organizations have the customer club module. Ask your Fiftytwo consultant if you're in doubt about whether your organization has the customer club module.
-
Sold out: Marks the article as sold out. The primary purpose of this setting is to remove the article from picklists and menus. If the article is available in a store, this setting will not prevent the article from being sold.
-
Blocking pricecorrections: Defines if shop assistants with the required user rights can correct the article's price, for example if it turns out to be wrong compared with what's been advertised. For some articles you may not want this to be possible, in which case you should select this option.
-
Print normal/save text: Defines if a special text should appear on receipts that lets customers view how much they've saved on the article compared with its full price, when a discount applies for the article.
-
Discount points: Defines if buying the article will earn the customer points that can later be redeemed for a discount, reward, or similar.
Points are calculated on the article's net price, after all article-specific discounts (including any discounts determined by means of payment). Customers will then earn one point per one currency unit.
-
Total discount: Defines if the article should be included in any total-based discount calculation.
-
Save stamps: Defines if the article should be included in the calculation of saving stamps, also known as discount stamps.
-
No manual discount: If you select this, shop assistants will not be able to grant manual discounts on the article, even if their user rights generally allows them to grant manual discounts on articles.
-
No discount: Defines if the article should be excluded from calculation of discounts via discount groups, even though the article's membership of a discount group would normally trigger a discount on the article.
-
Add additional information: Defines if additional information about the article, such as it's goods intake date, should be recorded when selling it. Information about goods intake date may be relevant for time frame-dependent articles, such as newspapers or weekly magazines.
-
Notification: Defines if a notification must be generated if the quantity of the article on a customer's purchase order is changed. This setting is primarily relevant for distance selling, where the customer can automatically get an e-mail notification.
Example: A customer has ordered five units of the article, but when your warehouse staff handle the order, it turns out that you only have four units of the article, so they adjust the quantity on the order. This can trigger an automatic notification to the customer, so that they can accept or reject the quantity change.
-
Repeat allowed: Defines if use of the till's Repeat key is allowed for the article.
-
Fixed price: Typically used for weight-variable articles when you want a fixed price for the article even though individual units of the articles don't weigh exactly the same.
Example: The article is frozen duck, where individual animals don't weigh exactly the same, but you want the same price to apply for all units of the article.
Click
at the top of the page to save. -
Add new articles
To add a new article:
-
Click
 in the top right part of the page.
 -
In the Article information section, specify the new article's Receipt text and unique Article number. Then click
in the top right part of the page. -
Now you can specify other relevant information about the new article as described from step 3 in Manage existing articles in the previous.
© 2026 Fiftytwo A/S • Disclaimer
Last update: 29 May, 2026 12:21:08 CET
Share this page with your colleagues: