 minute read
View groups (also known as PLU buttons) are very common in retail. They're made up of buttons that users can tap to sell or buy an article without having to scan it or enter its article number. The buttons typically have images for ease of use.
You can also set up view groups with the Fiftytwo Master Data API (see api.fiftytwo.com). Note, however, that the API only handles view groups on an enterprise level. If you need to set up dedicated view group buttons for use in a single store, for example in order to sell local produce in the store, you must use a combination of POS Designer (see Set up view group component on ViKING POS Designer diagram) and Store Management (see the following).
View group basics explained
View groups are convenient for shop assistants (for selling articles) as well as customers (for buying articles on self-service displays).
Use case examples
-
Supermarkets use view groups on shop assistant displays for selling articles that don't have barcodes, such as bread, fruit, and vegetables.
-
Supermarkets use view groups on their self-service checkouts (SCOs) so customers can themselves buy bread, fruit, vegetables, and other articles without barcodes.
-
Many hardware and DIY stores, garden centers, etc. use view groups because some of their articles are so bulky that they're difficult for staff to scan, even though the articles do have barcodes.
-
Many quick service restaurants (QSRs) use view groups on their customer self-service displays. The images on the view group buttons make it easy for customers to make their selections.
Additionally, view groups work excellently with the modifiers often used in QSRs. Modifiers are aspects of an article that can be changed for each order to suit the customer's preferences, for example a burger without tomatoes, but with extra cheese – read more about that in Add/remove modifiers in ViKING POS.
Groups and hierarchies
The buttons in a view group are typically grouped by article type, and may contain several levels of groups and subgroups.
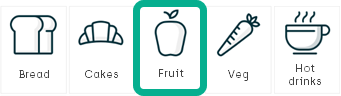
Here's a very simple example of a view group with articles arranged in a multilevel hierarchy that has five groups at the top level. Let's assume that you're a shop assistant who must sell an apple (or a customer who's going to buy an apple – the experience is the same):
-
On the top level of the hierarchy, you tap the Fruit group:
-
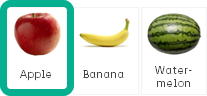
In the Fruit group, you then tap Apple:
The way that a view group looks and behaves, for example that the view group buttons in the example are rectangular and have images, is based on a template.
View group template
Your Fiftytwo consultant or a user interface designer in your organization has used ViKING POS Designer to set up a view group template for relevant stores. The template determines the basics of a view group:
-
How it looks (for example size, buttons, and whether or not to display prices), but not the actual images on buttons
-
How it behaves (for example if it displays a quantity selector after you've tapped the Apple button)
The template has some default settings. It's important that your Fiftytwo consultant or your organization's user interface designer has told you if they've used other settings than the defaults.
These are the most important default settings of a view group:
-
Display price of articles: Yes
-
Let users select variants and modifiers (if relevant): Yes
-
Display quantity selection dialog after users tap article reference button: No
Without a quantity selection dialog, users will have to, for example, tap an Apple button four times to sell four apples. For an experienced shop assistant this can sometimes be faster than using a dedicated quantity selection dialog. However, we recommend that you use a quantity selection dialog for self-service checkout (SCO) tills.
-
Display search field: No
-
Size of thumbnail images on buttons: 100 px wide, 80 px high
-
Tab levels: 3
-
Go back to hierarchy's top level after sale completed: Yes
What you must set up
Using the template and ViKING Store Management, your job is to specify the following for the tills in your store(s):
-
Which articles to include in the view group
-
Which images to use on the view group's buttons (buttons that represent articles automatically inherit images from the articles' master data if images have been defined there)
-
If and how to group articles in a multilevel hierarchy (example: a fruit group on the top level with the articles apple, banana, and watermelon on the second level)
-
When to display individual view group buttons (example: if a view group button concerns a meal deal that's only available for two hours around lunchtime Monday to Friday, you may not want it to take up space in the view group outside those hours)
We'll help you do that in the following.
Prerequisites
These things must be in place before you begin:
-
Template: Your Fiftytwo consultant or a user interface designer in your organization must have set up a view group template for relevant stores. If you're in doubt about whether or not this has been done, ask relevant colleagues or your Fiftytwo consultant.
The view group template has been set up on a particular diagram (that's a particular till user interface design) with a particular view group ID. Tills that are going to use the view group (that you're going to use the template to set up) must use the diagram and view group ID for which the template was designed.
-
Information: Your Fiftytwo consultant or your organization's user interface designer must have provided you with basic information about the view group template that they've set up in ViKING POS Designer, for example:
-
Information about the name of the diagram for which the view group template was designed
If required, you can yourself verify that relevant tills use the diagram for which the view group template was designed: In ViKING Store Management, go to Store Maintenance > Terminal configuration, and, for each relevant till, click the till number. On the General tab, in the User interface section, in the Primary UI field, you can then verify the diagram name.
-
Information about the view group ID for which the view group template was designed
-
If they've used other settings than the default view group settings: information about which non-default settings they've used
If you haven't received such information, contact your Fiftytwo consultant or the person in your organization who set up the view group template.
-
-
Articles: The articles that you want to include in your store's view group must exist in your store's ViKING setup. They've very likely been imported into your ViKING system from your organization's ERP system, so you can expect them to exist. If you're in doubt, you can search for the relevant articles in ViKING Store Management to verify that they exist: See Manage existing articles.
Set up new view group with articles in hierarchy
If this is the first time that you set up a new view group, we recommend that you read the Preparation section in the following before you begin.
Preparation
Let's briefly take one more look at the simple view group usage example from before, because it illustrates a fundamental principle behind view groups:
-
On the top level of the hierarchy, you tap the Fruit group:
-
In the Fruit group, you then tap Apple:
The principle is that view groups can have two types of buttons:
-
Buttons that refer to another view group
We call them group buttons. The Fruit button in the example is a group button. Users tap group buttons to navigate to other view group levels.
-
Buttons that refer to an article
We call them article buttons. The Apple button in the example is an article button. Users tap article buttons to sell stuff (or buy stuff if you're a self-service customer).
So, a view group can contain references to other view groups. That's important because that's how you create a multilevel hierarchy in your main view group. In other words: It's the fact that your main view group can contain sub-view groups that you use to create your main view group's multilevel hierarchy.
Make a sketch
If you're going to set up a main view group with a multilevel hierarchy based on sub-view groups, make a quick sketch of the view group structure that you're going to set up.
The reason for this is that the sub-view groups (and any sub-sub-groups, etc.) that you're going to refer to on your view group reference buttons must exist – otherwise you can't refer to them because you can't create a group button that refers to a sub-group that doesn't exist.
However – unlike articles that typically already exist in your ViKING system because master data about them has been imported from your organization's ERP system – the sub-view groups that you're going to refer to on your view group reference buttons typically haven't been created yet.
That's why it makes sense to create your hierarchy from the bottom up, so that you have all of the required sub-view groups in place before you finally create the main view group, and that's where a sketch can be really helpful.
Example of a quick view group sketch, where gray boxes denote group buttons, and white boxes denote article buttons:
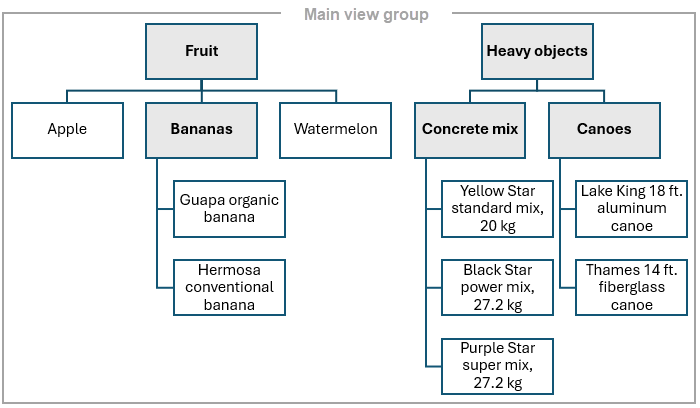
Building on the example, begin by creating the sub-view group Bananas. Then you can refer to it from the higher-level view group Fruit. Then create the sub-view groups Concrete mix and Canoes so that you can refer to them from the higher-level view group Heavy objects.
Also note that the main view group is implicit, so you don't need to set up a view group reference button to you main view group. ViKING will know that it's a main view group, because no other view groups refer downward to that view group.
Building on the example again, that means that your view group, when it's ready, will present itself with two buttons at the top level of its hierarchy: A Fruit group button and a Heavy objects group button.
Verify images for use on article buttons
When you create a group button, you can specify a text and an image for it (provided that images are allowed by the template).
When you create an article button, it'll automatically inherit its article name and its image from the ViKING system's master data about the article in question. However, some articles may not have an image defined in their master data, and that can make your view group look inconsistent if some article buttons have images and others don't.
During the process described in the following you have the option of verifying that the required articles have images defined, but it's typically easier to do the verification before you begin, so that you can concentrate on your hierarchy while you set up view groups: For each article, you can verify that they have suitable images on the Images tab when you Manage existing articles. That's also where you add an image, if an article needs one.
Typically, images will automatically scale to fit the view group buttons on which they appear, but if your organization's user interface designer or Fiftytwo consultant has asked you to use images of a particular size, aspect ratio, resolution, or file format, you should do that.
Set up the new view group
In the following, we look at how to specify articles, images, and any hierarchy levels for a view group in a single store. If you have chain administrator rights, you can do the same for all stores in a chain. Ask your Fiftytwo consultant if you're in doubt.
In ViKING Store Management, you can handle view group configuration in a table view (with rows) or in a grid view (with tiles). This description is based on the table view, but the principles are the same across the two types of view.
If you're setting up a multilevel hierarchy with sub-view groups inside your main view group, remember to begin by setting up each required sub-view group (and any sub-sub-view groups, etc.) before you finally set up your main view group. If so, repeat steps 1-5 in the following until you have the complete hierarchical view group structure that you require.
-
Open a browser, connect to the required ViKING store service (for single store management) or enterprise service (for multistore management), and log in.
-
Navigate to view groups:
-
Expand
 the menu in the left part of the page
 -
Expand Store maintenance
-
Select View groups
-
-
To add a new view group, click
 in the top right part of the page.
 -
Enter the view group ID number that your Fiftytwo consultant or your organization's user interface designer has told you to use.
Then enter a descriptive Name for the view group.
If you're setting up a sub-view group (or sub-sub-view group, etc.), type Sub (or Sub-Sub, etc.) as a prefix in the name. If you're setting up the main view group, type Main as a prefix in the name.
That'll help you maintain a good overview later when all the view groups on all levels in your hierarchy will be listed side-by-side on the main view groups page in Store Management.Optionally, enter a Description.
Then it's time to consider an image:
-
If you're going to use the view group as your main view group, don't add an image to it.
-
If you're going to use the view group as a sub-view group in a multilevel hierarchy (for example if this view group concerns Fruit, and you're also going to set up sub-view groups for Vegetables and Bread later), you can add an image for use on the group button that users will see on the POS:
To add an image to the view group (not to the view group's individual articles – we'll deal with that later), click the
 button and browse for the required image.
Typically, images will automatically scale to fit the view group buttons on which they appear, but if your organization's user interface designer or Fiftytwo consultant has asked you to use images of a particular size, aspect ratio, resolution, or file format, you should do that.
How, and if, images will appear on a view group's buttons is generally determined by the properties of your organization's view group template (set up in ViKING POS Designer), notably the template's properties Grid settings > Thumbnail width and Thumbnail height. Ask your Fiftytwo consultant or the user interface designer who set up the template in POS Designer if you're in doubt.
-
-
When you're ready, click
 in the top right part of the page to save the view group.
 -
A new View group details section appears in the lower part of the page.
To begin with the View group details section is empty, but we're going to add rows to it. Each row will represent a button in the view group.
Such a button can be either:
-
an article button that represents an article
- or -
-
a group button that provides a link to a sub-view group in a multilevel hierarchy
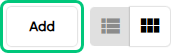
Click the Add button in the top right corner of the View group details section to get an empty row.
Then fill out the row:
-
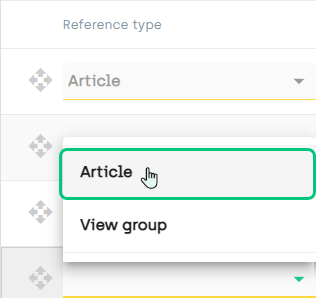
In the Reference type column, select either:
-
Article if you want an article button that links directly to an article
- or -
-
View group if you want a group button that links to an existing sub-view group so that tapping it will take the user to the next level in a hierarchy
-
-
In the Reference column, select the required article or existing sub-view group.
Click
 in the right side of the row to add your new button.
A new empty line is automatically added in case you to want to add further buttons. When you're done, and you don't need to add any more buttons, simply leave the empty line empty.
Button image
Provided that the template allows them to contain images, your buttons will inherit any image that's defined on the article or sub-view group that the button links to.
To verify if an image has been defined, you can click
 in the right side of the required row in the View group details section, and then select Go to article or Go to view group.
If no image is defined, you can add one:
Article: For an article, you can add a new image on the Images tab when you're viewing information about the article.
Other view group: For another existing view group, you can add a new image in the View group information section when you're viewing information about the other view group.Typically, images will automatically scale to fit the view group buttons on which they appear, but if your organization's user interface designer or Fiftytwo consultant has asked you to use images of a particular size, aspect ratio, resolution, or file format, you should do that.
How, and if, images will appear on a view group's buttons is generally determined by the properties of your organization's view group template (set up in ViKING POS Designer), notably the template's properties Grid settings > Thumbnail width and Thumbnail height. Ask your Fiftytwo consultant or the user interface designer who set up the template in POS Designer if you're in doubt.Button time management
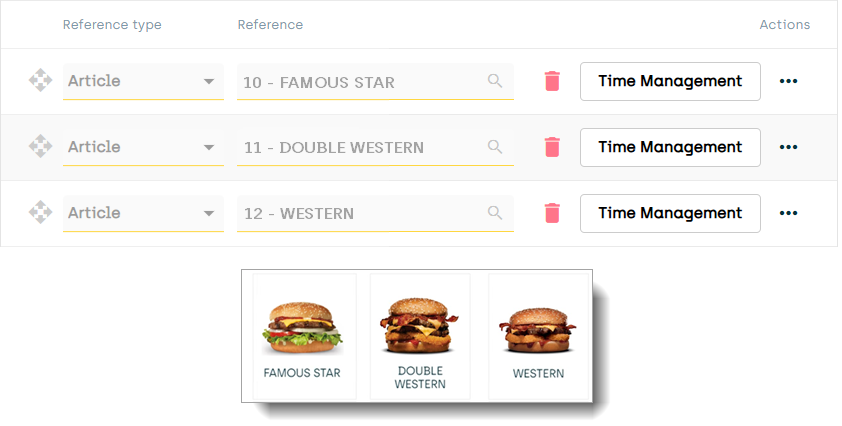
Do you only want to display a given button during certain times of the day?
Example: If a button in your view group concerns a meal deal that's only available for two hours around lunchtime Monday to Friday, you may not want it to take up space in the view group outside those hours.
To set up time management on a view group button (regardless whether it links directly to an article or to another existing view group), do the following:
-
Next to the required row in the View group details section of your view group, click Time management.
-
In the Time management section that appears, click Add.
-
On the new row that appears, select Enabled. Then select the days and time when the view group button should be displayed.
Example: Enabled; Monday, Tuesday, Wednesday, Thursday, Friday; 10.00-11.59.
-
Click
 in the right side of the row.
 -
If you need to display the button during multiple time intervals, add more rows to suit your needs.
Example:
Row 1: Enabled; Monday, Tuesday, Wednesday, Thursday, Friday; 10.00-11.59.
Row 2: Enabled; Thursday, Friday; 17.00-21.59
Row 3: Enabled; Saturday, Sunday; 10.00-21.59 -
When you're ready, click
 in the top right part of the page to save your time management settings for the button in question.
Repeat if you want to set up time management for further view group buttons
-
-
When you've added multiple buttons, the button that's represented by the top row will appear in the view group's top left position on the POS display, the button represented by the next row will appear in the next position to the right, etc.
Relation between button sequence in Store Management table and on POS displays:
Top row in Store Management table means top left position on POS display, second row from top means next position to the right on POS display, etc.To change a button's position, click
 on the required row and drag it to the required position in the row sequence.
Bear in mind that the view group may appear on displays of various sizes, resolutions, shapes, etc., so a row's position in Store Management guarantees the button a specific position in the view group's button sequence, but not a fixed position across various displays.
-
When you're ready, click
 in the top bar to save your view group settings on the ViKING store service.
Your view group settings are now saved on the ViKING store service, but they haven't yet been distributed to the tills (see the following).
-
If you're creating a multilevel hierarchy of view groups, repeat steps 3-7 until you have the required hierarchy.
Add article to existing view group
-
Open a browser, connect to the required ViKING store service (for single store management) or enterprise service (for multistore management), and log in.
-
In the ViKING Store Management top ribbon, select View Groups.

Example only: Options in top ribbon depend on your user rights -
In the list of view groups, click the number of the view group that you want to edit. It can be your main view group, but often it'll be a sub-view group, for example a Fruit sub-view group if the article that you want to add is an orange.
-
In the View group details section in the lower part of the page that appears, click the Add button.
-
In the empty row that appears, in the Reference type column, select Article.
-
In the row's Reference column, select the article that you want to add.
-
Click
in the right side of the row. -
Do you want to verify if the article has an image defined that can be used on the button that'll represent the article?
-
No: Go to next step.
-
Yes: Click
in the right side of the row, and select Go to article and verify that the article has an image defined. See Button image for more information.
-
-
Do you only want to display the article's button during certain times of the day?
-
No: Go to next step.
-
Yes: Click the row's Time management button. See Button time management for more information.
-
-
If you want to change your new button's position in the view group's button sequence, click
on the row that represents the new button and drag it to the required position in the row sequence. The button represented by the top row will appear in the view group's top left position on the POS display, the button represented by the next row will appear in the next position to the right, etc. -
When you're ready, click
in the top bar to save your view group settings on the ViKING store service.Your updated view group settings are now saved on the ViKING store service, but they haven't yet been distributed to the tills (see Distribute view group settings to tills in the following).
Remove article from view group
-
Open a browser, connect to the required ViKING store service (for single store management) or enterprise service (for multistore management), and log in.
-
In the ViKING Store Management top ribbon, select View Groups.
Example only: Options in top ribbon depend on your user rights -
In the list of view groups, click the number of the view group that you want to edit. It can be your main view group, but often it'll be a sub-view group, for example a Fruit sub-view group if the article that you want to remove is an lemon.
-
In the View group details section in the lower part of the page that appears, on the row that represents the article that you want to remove, click
 .
. -
Make sure that you're removing the correct article, and then click Yes in the confirmation dialog.
-
Your updated view group settings are now saved on the ViKING store service, but they haven't yet been distributed to the tills (see Distribute view group settings to tills in the following).
Distribute view group settings to tills
To distribute your new or updated view group settings to relevant tills in your store (that is tills that use the POS Designer diagram on which your organization has set up the view group template with the required view group ID), do the following:
We recommend that you distribute the view group to a single till to begin with, and test the view group on that till, before you distribute the view group to other tills in your store.
If a till is processing an ongoing sale, it'll receive the update when the sale has been completed.
-
Expand
the menu in the left part of ViKING Store Management -
Expand Store maintenance
-
Select Terminal configuration
Then, for each required till:
-
Click the till's Till number
-
In the top right part of the Terminal configuration page, click Update master data

This will send all master data updates, that are available on the store service and relevant to the till in question, to the till. This may include other master data than you've defined in ViKING Store Management's view groups configuration. It may, for example, also include other updates to the till's user interface, updates to text sections, and updates to the till's article list (also known as a PLU table). Ask your Fiftytwo consultant if you're in doubt.
Test view group on tills
How to test a view group on tills depends entirely on how you've set up the view group, and what you want users to be able to achieve with it (for example if the view group is used on a self-service checkout (SCO)).
However, you'd typically want to verify that:
-
Workflows, including button references to articles and sub-view groups, work as intended
-
That hierarchies are meaningful and not too deep (deep hierarchies can lead to what feels like excessive tapping)
-
Buttons look alright (size, texts, images, shapes, etc.) and follow corporate design guidelines (fonts, colors, etc.) as well as any accessibility requirements that apply in your country or region
-
Users are able to specify quantities (if set up in your organization)
-
Users are able to specify modifiers (if set up in your organization)
For help on using view groups on tills, see:
Related: Set up view group component on ViKING POS Designer diagram
Related: ViKING POS
© 2026 Fiftytwo A/S • Disclaimer
Last update: 29 May, 2026 12:21:08 CET
Share this page with your colleagues: