 minute read
In this topic, we look at how to perform more sales-related tasks in 52ViKING POS, so this topic is a natural continuation of Handle sales in 52ViKING POS.
Just like in the other topic, we begin with an overview of the basics of the 52ViKING POS journal area:
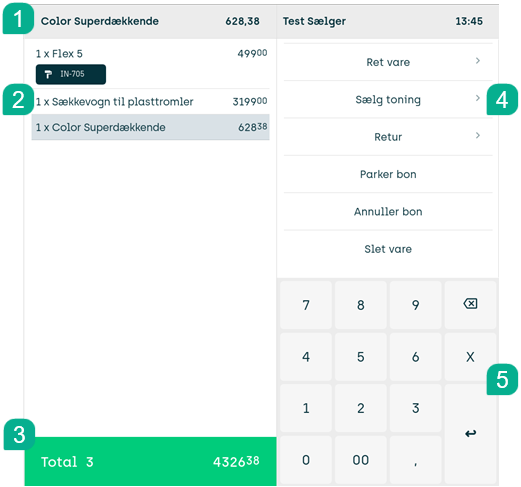
1: Information line – displays selected article, shop assistant ID, time, errors, etc.
2: Journal – the area where you build up a purchase order when you scan or manually add articles
3: Total area – where you tap to complete the sale and receive payment
4: Menu – content changes depending on what you're working on
5: Keypad – for entering article numbers, multiples, discounts, corrections, etc.
Delete unwanted article
If a customer changes their mind, you can delete an article from the journal:
-
In the journal, select the line that represents the unwanted article.
-
In the menu on the right side of the display, tap Delete line.
If you've sold multiple identical articles on a single line in the journal, Delete line will delete the entire line. So if you've scanned five identical articles as a single line in the journal, and the customer then decides that they only want four of those articles after all, you'll need to sell those four articles again.
Any discounts triggered by the deleted article are also deleted.
You can only use Delete line as long as you haven't completed the sale. If you've completed the sale, use the Returns feature instead.
Grant manual discount
At your discretion, you can grant an ad-hoc discount on either a particular article in the journal or on a customer's total purchase.
The ability to grant discounts may require specific user rights in your organization. Also, it may not be possible to grant discounts of some articles, for example alcohol, tobacco, bottle deposits, or other articles that your organization has set up with a fixed price that you can't change. Ask your supervisor if you're in doubt.
Grant discount on article
-
Select the required article in the journal
-
In the menu on the right side of the display, tap Edit article
-
Then tap Edit price
-
In the Item discount field, specify the required discount in either percent (example: 10%) or an amount (example: EUR 10.00)
You can't specify a discount that's higher than the price of the article.
-
On the keypad, tap

This will deduct your manual discount on the selected line in the journal, and the total price in the green Total area will reflect the discount
If it's been set up on your organization's 52ViKING system, you may be asked to select a reason code that reflects why you granted the discount. Such reason codes are used for statistical purposes. Ask your supervisor if you're in doubt.
Grant discount on total purchase
-
In the menu on the right side of the display, tap Edit article
-
Then tap Edit price
-
In the Total discount field, specify the required discount in either percent (example: 10%) or an amount (example: EUR 10.00)
You can't specify a discount that's higher than the price of the article.
-
On the keypad, tap
This will deduct your manual discount across all articles in the journal, and the total price in the green Total area will reflect the discount
If it's been set up on your organization's 52ViKING system, you may be asked to select a reason code that reflects why you granted the discount. Such reason codes are used for statistical purposes. Ask your supervisor if you're in doubt.
Combine total purchase and article discounts
If required, you can combine a discount on a customer's total purchase with one or more discounts on individual articles, like in this example where we've granted a discount of 10% on the customer's total purchase as well as a discount of 50% on one of the articles:
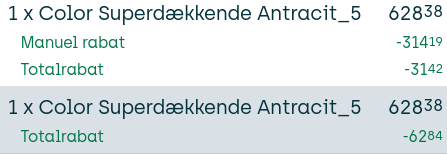
In the example, note how the 10% discount on the total purchase is applied after the 50% discount has been deducted from the price of the article in question.
Park and resume ongoing purchase
You may occasionally need to park the articles that you've added to a journal, for example if a customer has forgotten their wallet and needs to come back later to complete their purchase. While such a purchase is parked, you can serve other customers. When the original customer comes back, you can then resume their purchase.
-
During an ongoing purchase, tap Park receipt in the menu on the right side of the display
The till ends your operator session, and till's receipt printer prints a temporary, non-valid receipt with a reference number that you can use to identify the parked purchase when you later want to resume it
If required, you can now serve other customers
-
When you're ready to resume the original customer's parked purchase, make sure that you're logged in, and then tap Resume receipt
-
You can now either:
-
Select the required parked receipt on the left side of the display
- or -
-
Scan the reference number of the temporary receipt that the till printed when you parked the purchase
-
How long can I park an ongoing purchase?![]()
Can I park a purchase on one POS and resume it on another POS?![]()
Cancel purchase
To cancel a customer's purchase and delete the entire journal about the purchase, tap Cancel receipt in the menu on the right side of the display.
If you've already tapped the green Total area in order to get payment, but you haven't received payment yet, you need to tap Back to sale before you can tap Cancel receipt.
If you've received payment, the sale is closed and you can't cancel it. However, you can make a return instead.
Answer price inquiry
You can answer price inquiries at the till, but the way that you do it may vary from organization to organization.
Some organizations use a dedicated Price inquiry button in the menu. In other organizations, you simply scan the article to view its price, and if the customer still wants the article, you sell it to them. If the customer doesn't want the article, you tap Delete line in the menu (if the customer is buying other articles) or Receipt > Cancel receipt (if the customer isn't buying anything after all). Ask your supervisor if you're in doubt.
Receipt copies
If required, you can quickly print a copy of the last receipt that you've issued, so that the customer can quickly get a copy if, for example, their original receipt was misprinted or accidentally cut in half: In the menu, tap Receipt > Print last receipt.
Particular user rights may be required to make receipt copies. Ask your supervisor if you're in doubt.
Receipt copies will typically be clearly marked with a COPY text or similar.
If a customer needs a copy of a recent receipt that isn't the last one that you've issued, tap Receipt > Reprint previous receipt, select the required receipt from the list of recent receipts, and tap Reprint receipt.
In some organizations, you can look up and print a copy of a previous receipt on another till than where the original receipt was issued. This however, only applies in the store where the original receipt was issued. You can't look up and print copies of receipts from other stores.
You can use the receipt copy function to print a receipt on a till where receipt printing has otherwise been disabled (for example a till in an ice cream kiosk where customers typically don't require receipts), so that you can issue ad-hoc receipts to customers who want them. When you use the copy function to print a receipt on a till where receipt printing has otherwise been disabled, the receipt will not contain the COPY text on the first copy because it isn't really a copy. It'll only contain the COPY text if you make a subsequent copy.
In some countries it's not allowed to print more than one copy of a receipt. Ask your supervisor if you're in doubt.
Discount stamps
Some organizations hand out physical or virtual stamps that customers, when they've collected a required number of stamps, can use to get discounts, access to cheap articles, or similar.
How many stamps a customer is entitled to typically depends on the total amount of the customer's purchase. However, some article types may not trigger stamps because they're somehow exempt. Thus, even if customers by default earn, for example, one stamp per EUR 1 they purchase for, a purchase of EUR 10 will not necessarily trigger ten stamps if some of the customer's articles are exempt from triggering stamps.
That's why it's not always easy for shop assistants to work out how many stamps a given customer's purchase entitles them to. In organizations that hand out stamps, the 52ViKING POS display is therefore typically set up to automatically show you how many stamps individual customers' purchases entitle them to. Ask your supervisor if you're in doubt.
If you get an error
If you run into an error while you use the till, you'll see an error message in the gray information line above the journal.
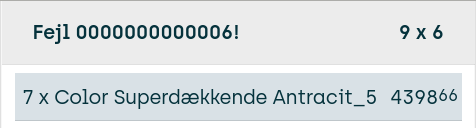
You typically need to clear the error before you can continue. To clear an error, tap C or ![]() on the display's keypad.
on the display's keypad.
Access external resources
In some organizations you can access external resources from the menu:
-
In the menu on the right side of the display, tap Functions.
-
Tap the button that represents the required external system. Ask your supervisor if you're in doubt.
-
When you're ready to return to the POS system, tap Back to sales (or tap the arrow icon in the top left corner of the external system page).
Customer analyses
If your organization performs occasional or regular customer analyses, for example by asking customers about their postcodes, 52ViKING POS will automatically remind you when you must ask a customer for such information.
Customization example: Sell paint tintings
The ability to sell paint tintings in 52ViKING POS is only available for specific paint stores, so this is an example of how it's possible to customize 52ViKING POS to suit the needs of individual retail chains and their customers. Ask you r supervisor if your chain has customizations.
-
In the menu on the right side of the display, select Sell tinting.
-
You can now view a list of available tintings. Tap the required tinting to add it to the journal.
The information about each available tinting includes type of paint, volume, etc., so the price is automatically displayed when you add the tinting to the journal.
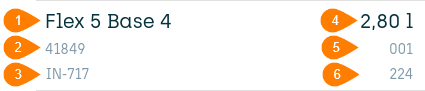
Example of tinting information. 1: Article name. 2: Article ID. 3: Label number. 4: Volume. 5: Quantity. 6: Color chart number.The list of available tintings is long. How do I find the correct tinting?

Add tinting to article that's already in journal
If required, you can add a tinting to an article that you've already added to the journal. This way, if you've already scanned a can of paint, you can add the tinting to it afterward:
-
In the journal, select the article that contains the paint that you want to add a tinting to
-
In the menu on the right side of the display, tap Edit article
-
Tap Add tinting
-
Tap the required tinting in the list to add it to the article
Edit tinting
If you need to edit a tinting that you've added to the journal:
-
In the journal, select the article that contains the tinting that you want to edit
-
In the menu on the right side of the display, tap Edit article
-
Then tap Edit tinting
-
Edit the following fields as required:
-
Color number: The same as the label number in the previous example (3 in the example illustration).
-
Color chart: The same as the color chart number in the previous example (6 in the example illustration).
-
Color serial number: Value that you very rarely need to edit. It's only used with old systems. If you're in doubt, leave the field with its default value 000.
-
-
On the keypad, tap
Delete tinting
If required, you can delete the tinting from an article that you've added to the journal, so that only the can of paint itself remains on the journal:
-
In the journal, select the article that contains the tinting that you want to delete
-
In the menu on the right side of the display, tap Edit article
-
Tap Edit tinting
-
Tap Delete tinting
Related: Search for articles in 52ViKING POS
Related: Add/remove modifiers in 52ViKING POS
Related: Handle returns in 52ViKING POS
Related: 52ViKING POS till management (cash statements, etc.)
Related: 52ViKING POS dashboard
Related: Handle B2B customers in 52ViKING POS
© 2026 Fiftytwo A/S • Disclaimer
Last update: 30 March, 2026 14:06:31 CET
Share this page with your colleagues: